Installing Solar on a Standing Seam Metal Roof
At first glance, standing seam looks “easy.” It can be—if it’s done correctly. The big advantage is you can often mount solar using seam clamps (no roof penetrations for the racking), while still achieving a clean, strong, serviceable array.
Thermal movement
Metal roofs expand/contract. Clamp layout, rail strategy, and wire management must respect movement.
Roof integrity stays intact
The racking typically clamps to seams—your roof’s waterproof layer remains unpunched for the mount system.
One penetration still exists
Conduit from array to electrical equipment usually requires one roof entry—flashed and sealed by a roofer.
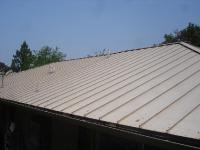
Standing seam roof: the install environment
Here’s the roof type this page covers—standing seam metal panels, with raised seams that accept clamp hardware.
1) Mounting Feet (S-5 seam clamps)
These are Unirac S-5 seam clamps (often called “clips”) that attach directly to the standing seam and create the infrastructure to host solar electric panels.
The clamps are tightened with an Allen wrench. Typical layout is two to three clamps per panel in each row, depending on engineering and system design.


2) Waterproofing (the one penetration that matters)
The only penetration on a typical standing seam installation is the conduit route leading from the solar array to the main electrical panel (or inverter/battery equipment).
That roof entry is drilled, flashed, and waterproofed by our licensed roofing contractor. Standing seam can be “easy” until someone gets careless on the one penetration that actually exists.
3) Bolting the Solar Panels (wiring + clamp rhythm)
Once the S-5 clips are laid out on the roof, the team begins attaching electrical wiring and bolting panels in place. When the crew gets into a groove, standing seam installs can move fast—without sacrificing quality.
The system can often be expanded later by adding more panels (space and electrical capacity permitting). On production days, the meter is spinning backwards for most of the day.


4) Enjoying the Sun During the Install (and staying safe)
Once the team is dialed in, the installation moves right along. Standing seam roofs can be slick—safety, footing, and staging are part of the workmanship.


5) Completed Array (clean lines, clean roof)
The finished system should look intentional—straight edges, consistent spacing, and a roof surface that remains intact. Standing seam arrays can look especially sharp because the roof geometry naturally “guides” alignment.


Standing seam checklist (what we verify before we clamp)
These details separate “it’s on the roof” from “it’s engineered, serviceable, and clean.”
Seam type + gauge
Not all seams are the same. Clamp selection and torque must match the seam profile and metal thickness.
Thermal expansion plan
Metal moves. We route and secure wiring to accommodate seasonal expansion/contraction without chafe.
Wind zones
Edges/corners can see higher uplift. Clamp density and rail strategy must account for uplift forces.
Bonding/grounding
We confirm racking bonding, module bonding, and the full grounding path per code and equipment requirements.
Roof entry location
We choose the cleanest conduit route and flash it correctly—this is the “one penetration” that must be perfect.
Future expansion
If you might add panels later, we plan electrical capacity and layout so expansion doesn’t look like a patch job.
First consideration: picking the best roof face
The first consideration for all solar installations is picking the best roof face to use for your system. Factors to consider are shade from trees/chimneys and the conduit run from the panels to the main electrical panel.
Design it right once. Install it clean once. Service it easily forever.